
How to Create a New Document Template
Step 1: Add a New Document Template
- Click on "New Doc Template": In the "Doc Templates" section, click on the "+ Doc Template" button on the top right.
Step 2: Fill in the Document Template Details
- Template Type: Choose the template type you want to use from the dropdown menu.
- Template Name: Enter a name for your template.
- Entity ID (Optional): Add an entity ID if you have one in your system of records.
- Select Owner Email: Choose the owner of the template from your user list.
- Doc Sample: Drag & drop a sample document or click to select one from your files.
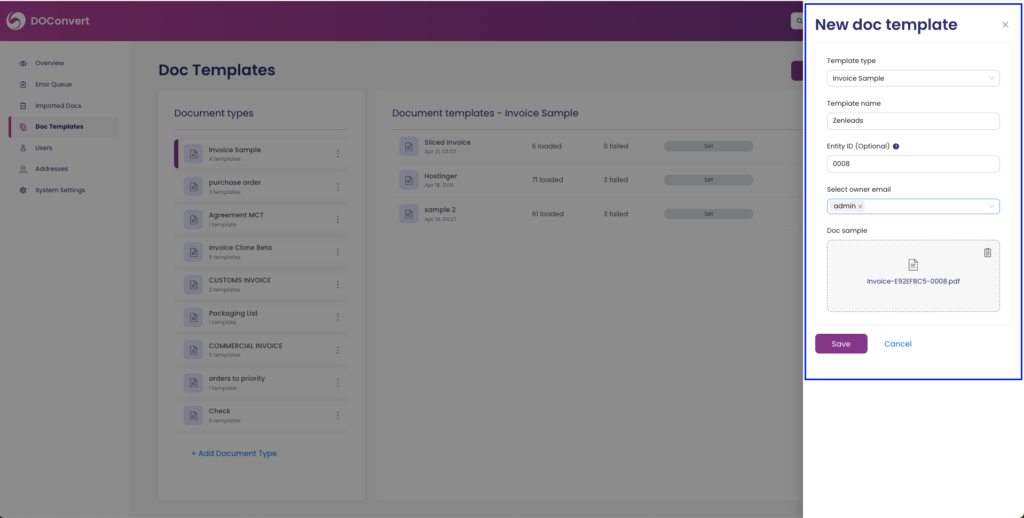
Step 3: Save the Document Template
- Click on Save: After filling in all the details, click the "Save" button to create your new document template.
How to Map Fields in DOConvert Automatically
After creating your document type and uploading a document, the next step is to map the fields. This ensures that DOConvert correctly identifies and extracts the necessary information from your documents.
Here’s a visual guide to help you with:
Step 1: Mark Header and Footer
- Mark the Header: Identify the header section of your document and mark it appropriately.
- Mark the Footer: Identify the footer section of your document and mark it appropriately.
Step 2: Mark General Fields
- Select Fields to Map: On the left-hand side, you will see the fields that you selected when creating the document type.
- Choose the Field: Click on the title of the field you want to map (e.g., Invoice Number, Invoice Date, Amount, Tax).
- Map the Content: Right-click on the content in the document that corresponds to the selected field and choose the appropriate value.
Step 3: Mark Table Area
- Identify Table Area: Locate the table area within your document that contains multiple rows of data.
- Mark the Table Area: Click and drag to mark the entire table area in the document.
Step 4: Fit Columns to Template
- Select Columns: Identify each column within the marked table area.
- Fit Columns: Ensure that each column fits correctly into the template by clicking and adjusting as needed.
Final Step: Save and Next
- Save Mapping: After marking all necessary fields and table areas, click the "Save and next" button.
- Review and Confirm: Review the mapped fields to ensure accuracy. Make any necessary adjustments.
- Save Template: Click on the "Save template" button to finalize the mapping process.
By following these steps, you will successfully map the fields in your document, ensuring that DOConvert can accurately extract and process the necessary data. This mapping process is crucial for maintaining data integrity and consistency across your documents.
How to Map manually Table Fields in DOConvert
Mapping table fields manually in DOConvert allows for precise control over how data is extracted from tabular sections of your documents. Follow these steps to manually map table fields:
Here’s a visual guide to help you with:
Step 1: Access the Document Template
- Navigate to Document Templates: On the left-hand side menu, click on "Doc Templates".
- Select the Template: Choose the document template you wish to map.
Step 2: Mark the Table Area
- Identify Table Area: Locate the table area within your document that contains multiple rows of data.
- Click on "Manual Setup": Click the "Manual Setup" button to begin the process of marking the table area manually.
- Mark the Table Area: Click and drag to mark the entire table area in the document.
Step 3: Select Columns for Mapping
- Open Table Mapping: After marking the table area, click on the "Edit" button next to the table field to open the mapping interface.
- Add Columns: Click on "Add Column" to start mapping each column in the table.
- Specify Column Details: For each column, specify the following details:
- Column Name: Enter a name for the column (e.g., Item, Quantity, Price).
- Column Type: Select the type of data contained in the column (e.g., Text, Number, Date).
Step 4: Map Columns Manually
- Click on Column Header: Click on the header of each column to manually select and map the data.
- Drag and Adjust: Drag the column boundaries to adjust the selection and ensure it covers the correct data.
Step 5: Validate and Save
- Validate Mapping: Check the mapping to ensure all columns are correctly mapped and aligned with the data in the document.
- Save Mapping: Click the "Save" button to save the manually mapped table fields.
Final Step: Review and Confirm
- Review Mapped Table: Review the table fields to ensure accuracy. Make any necessary adjustments.
- Confirm Changes: Confirm the changes to finalize the manual table field mapping.
By following these steps, you will be able to manually map table fields in DOConvert, ensuring precise and accurate data extraction from your documents.
How to Post-Process Data in DOConvert
After mapping your fields, you may need to perform post-processing on the extracted data. This includes tasks such as changing the date format or removing symbols from numbers. Follow these steps to efficiently post-process your data in DOConvert.
Here’s a visual guide to help you with:
Step 1: Access Post-Processing Options
- Navigate to Document Templates: On the left-hand side menu, click on "Doc Templates".
- Select the Template: Choose the document template you wish to edit.
- Open Post-Processing Settings: Click on the "Edit" button next to the relevant field to access post-processing options.
Step 2: Change Date Format
- Select Date Field: Click on the field that contains the date.
- Choose Date Format: Select the desired date format from the dropdown menu (e.g., MM/DD/YYYY, DD/MM/YYYY).
- Apply Changes: Save the changes to update the date format across all relevant documents.
Step 3: Remove Symbols from Numbers
- Select Number Field: Click on the field that contains the number with symbols (e.g., currency symbols like $).
- Enable Symbol Removal: Check the option to remove symbols from the number.
- Specify Symbols to Remove: Enter the symbols you wish to remove (e.g., $).
- Apply Changes: Save the changes to clean the numbers across all relevant documents.
Step 4: Apply Custom Transformations
- Add Transformation Rule: For custom transformations, click on the "Add Rule" button.
- Define Transformation: Specify the transformation logic (e.g., replace, remove, format).
- Test Transformation: Apply the transformation to a sample data set to ensure it works correctly.
- Save Rule: Save the rule to apply it to all relevant data fields.
Final Step: Review and Confirm
- Review Post-Processed Data: Check the transformed data to ensure accuracy.
- Confirm Changes: Confirm the changes to finalize the post-processing steps.
By following these steps, you will be able to efficiently post-process your data in DOConvert, ensuring it meets your specific formatting and content requirements.